2017년 10월 19일 목요일

Understanding diffuse transfer function.

Diffuse transfer function

In PRT, transfer function includes much information(visibilityintereflected lighting) and projected to sh coefficients in offline using monte carlo integration. But many game engine uses sh lighting without these pre-computed transfer function. For example, characters usually don’t contain visibility data for each vertex or texture. So we have to do lighting with only surface normal and lighting function. Because we don’t have pre-computed transfer function, Lambert(clamped cosine) function like below image will be used. 

Maybe you might have wondered how this Lambert transfer function could be generated in runtime. Ok, Cosine function could be projected to sh coefficients using monte carlo integration. But transfer function should be different for specific surface normal. How could this transfer function be rotated along surface normal vector? The famous R.Ramanmoorthi’s IrradianceEnvironmentMap paper lacks detail explanation for this process.

Irradiance Convolution

The convenient Irradiance convolution is like this.
Llm is lighting function,
L(θ,ϕ)=l,mLlmYlm(θ,ϕ)
Tlm is transfer function,
T(θ,ϕ)=l,mTlmYlm(θ,ϕ)
Then irradiance E is,E=l,mLlmTlm

Analytic diffuse transfer function

In this paper, You can learn how cosine function is projected to sh coefficients analytically. Note that this function is in local coordinate.A(θi)=cosθi=n=0AnYn,0(θi)
An=2π0π2Yn,0(θi)cosθisinθidθi
An=2π(2n+14π)01Pn(u)P1(u)du
-11Pa(u)Pb(u)=22a+1δa,b
n=1:An=π3
n>1,odd:An=0
n=even:2π2n+14π-1n/2-1(n+2)(n-1)×[n!2n(n!/2)2]

Local? World? coordinate

The analytic cosine function above is in local coordinate. It means that you can use it with surfaces whose normal vector is z axis. So you have to rotate this along surface normal vector.

Rotation of clamped cosine function(Zonal harmonics rotation)

When (θ,ϕ) is direction to which we want to rotate,
Arlm is rotated cosine function along (θ,ϕ),
Aolm is original cosine function along z axis,
Arlm=4π2l+1AolmYlm(θ,ϕ)
When n is 1, A1=π3 and 4π2l+1=2π3Ar1=2π3 and other coefficients match as well.
So in conclusion you just need to use this Arn coefficients to rotate diffuse transfer function. And you can use this resulting coefficient to do dot product with lighting coefficients as R.Ramanmoorthi’s IrradianceEnvironmentMap paper says.

Other BRDF

Most game engine uses same diffuse transfer function like above even the diffuse BRDF of surface is not Lambert, therefore indirect lighting for BRDF other than lambert is not realistic. But with knowledge like this we could do better. The Order 1886 generated skin diffuse transfer function which is projected by monte carlo integration and used it as skin diffuse lighting. If we have other isotropic diffuse BRDF function we could do exactly same thing like this.

2017년 10월 12일 목요일

Apps for writing

Writing app

Recently, I tried to establish optimal writing environment. I usually Microsoft OneNote for Memo and blogging. It is actually very good application for memo and clipping useful web urls. But when you want to do some format (ex : Bold or underline or others) it would be really painful because you have to click mouse many times during typing. And finally I came to know MarkDown and editors which support MarkDown like iAWriter and Scrivener. And found that many people uses these apps for blogging and writing their books. So I tried these app.

Scrivener

This app is really powerful and professional. Lots of people uses this app for writing books and paper. In my opinion, most powerful feature of this app is the Organizing. You can collect datas and small part of text(with MarkDown support) and compile all these material to one big book or paper. I barely understands very small parts of features of this app. But I felt like this is too much for my purpose.

iAWriter

I am writing this post using this app. IAWriter is simple app app compared to Scrivener. But this app has Focus Modewhich help you to focus only on writing and simple organizing feature which make you write small parts of whole text and make one big text. And it supports MarkDown flawlessly. I bought both iOS version and Mac version. It seems that it is perfect fit for blogging and small writing. The only bad thing of this app is the fact that it only support iOS and Mac.

Theme for iAWriter

If you want to use iAWriter to write blog post about programming or math, you may have to install below theme. Because the default themes doesnt support code syntax hightliging and MathJax. After installing this theme you can copy content in Preview mode and paste to blog pages. You could also export as Html or PDF or Microsoft Word format but copy & paste would be best choice for blogging.

2017년 10월 2일 월요일

Spherical harmonics

The purpose of this post

I don't want to explain the mathmatical details of spherical harmonics in this post. Actually I am not that good at math. There are tons of great article about spherical harmonics that has great mathematical explanations. But not many people try to read these article to understand this useful toolset because they cannot even imagine how useful this is. I just want to tell what spherical harmonics could do and emphasize one more time with some useful links. so I will focus on top level explanation and will try to use intuitive words as possible as I can.

What is spherical harmonics(SH)

Complex spherical function can be encoded as SH coefficients vector. In other words, you can compress cube map to several number of float vector although high frequency signal will be lost mostly. The process which transform complex function to sh vector is called Projection. You can find the mathematical details under SH on the internet. Like Robin Green's gritty detail or Sloan's stupid SH tricks papers. These two papers are the best explanation about spherical harmonics lighting. Maybe you might not be able to understand these article at once. But if you try several times you could understand one concept by one.

example usage

  • Lighting signal over sphere can be represented using SH.
  • Visibility(Shadow signal) over hemisphere can be represented using SH.
  • BRDF can be can be represented using SH. For example lambert diffuse BRDF.

spherical harmonics dot product

Integral of product of two functions can be done by simple dot product. Many article will tell you that this is the most important property of spherical harmonics. Usually many integral problem like diffuse lighting convolution(adding all diffuse lighting contribution over hemisphere) cannot be calculated at runtime, but can be done if we use spherical harmonics. In other words the rendering equation can be solved using spherical harmonics at least for diffuse surfaces.
The process is like below(very simplified version. You can find all detail explanation on the internet). This is most basic and simple usage of spherical harmonics in lighting.
  • You need SH coefficients vector which is projected from lighting over sphere(ex : cube map).
  • You need SH coefficients which represents clamped cosine function.
  • Simple Dot product of two coefficients is same as sum of all irradiance over hemisphere.
  • Evaluate Irradiance for certain normal.

Adding spherical harmonics coefficients

Adding two spherical harmonics lighting coefficients vector means that adding two lighting signal.This is also very simple and useful property. I think this is so intuitive property so there aren't much to talk about this.
  • You have sh vector for skylight and sh vector for some bounced lighting from the floor.
  • Adding these two sh vector results to sh vector which has both lighting signals.

Multiplying two spherical harmonics signal

Adding two sh vector makes sh vector which represents added spherical signal. And dot product of two sh vector results integral of product of two signal(ex : diffuse lighting convolution). But what if when we need some new sh vector which is the result of multiplication of two spherical signals. For example, we multiply shadow function to lighting signal. This cannot be done by adding or dot product. Maybe you can imagine multiplying vector component by component would do this magic but it is not that simple. And it is one of most difficult concept relating spherical harmonics. Actually this operation is vector-matrix multiplication. If we have light sh vector and shadow sh vector, we can multiply some special matrix which is made from shadow sh vector to light sh vector. This is called Triple product integral. There is good article explaining how this works(Better than Robin Green's).

Rotation of spherical harmonics

We can rotate spherical harmonics vector. Rotation of spherical harmonics vector is the most difficult concept to understand among the sh toolsets. But important thing is that we can rotate spherical harmonics. But when do we need this? Suppose you encoded ambient occlusion signal for each vertex for skinned mesh(animated character), you will have to rotate the AO SH vector like we rotate normal vector according to movement of vertex. You can find the underground detail in Robin Green's article. And also can find optimized rotation method from below link.

Convenient zonal harmonics

Zonal harmonics is rotationally symmetric basis functions among all sh basis whose m number is zero. These basis is frequently used to approximate functions which is symmetric along z axis. 
  • Simple Diffuse Transfer function).
  • Adding analytic lighting to existing sh vector.
  • Light Propagation Volume uses ZH for light injection to voxel.

Spherical Harmonics code in UE4

You can learn about spherical harmonics usage from UE4. There are several typical use case like light map evaluation(UE4 uses sh light map), and irradiance volume evaluation. In BasePassPixelShader.usf, you can find GetPreComputedLighting function, and you could learn how actual sh lighting shader code looks like. Like I said before, It is simple dot product between lighting sh vector and diffuse transfer function made from normal vector. If you are more curious person you could look into Lightmass source code and could find how lighting and ambient occlusion signal is projected to light map. If you are working on UE3, LightEnvironment gathers static light to one 3rd order spherical harmonics vector analytically for moving character in CPU. This is also very interesting use case of spherical harmonics. Maybe there are more SH use cases in Unrealengine, for example skylighting, you could look for another one for fun.

2017년 9월 30일 토요일

Directional Light Shadow Caching with UE4 Deferred Shadow


Multiple shadow map for one light

Shadow map technique is widely used for realtime rendering. Some methods like cascaded shadow map uses multiple shadow map to cover wide area effectively. Forward renderer bind multiple shadowmaps or use shadowmap atlas to properly project world space position to light space. Sometimes this multiple texture binding is not good for various reason. For example, binding multiple shadowmaps in aUE4 basepass is bad idea because it will reduce limit texture usage of material editor. Like landscape material this could be severe problem. Atlsing could be solution but this is not topic this time.

Deferred shadow

UE4 uses special buffer which uses to draw shadow result, called LightAttenuationBuffer. UE4 project world position to light space in basepass or lighitng pass. Instead projection is being done special ShadowProjection which only calculate shadow value of specific light.
This seems to be a little inefficient because of multiple pass. But it is very useful for various reason. The best benefit of this method is easy combining multiple shadow map like cascaded shadow maps. We dont have to concern which shadow map should be sampled for some world position. We just can MIN blend to shadow result buffer(LightAttenuationBuffer).

Shadow Caching

Dynamic shadow could be very expensive in various situations. It require additional shadow depth pass. If geometry complexity is high or masked material is used, the cost could be even higher. I see many next-gen console titles uses similar shadow caching technique to reduce the cost of their shadow depth pass. Caching or Pre-baking of shadow depth map could reduce the cost of shadow depth pass to almost zero in specific condition. Even worst case, shadow depth cost could be distributed to several frames. But this technique only could be applied when shadow casters and shadow receiver is specified. For example, spot/point light  has specific sets of shadow casters and receivers. Shadow for these light type could be easily cached or baked to limted size texture. But shadows for global light(ex : directional light) cannot be cached to one texture, and usually updated view dependantly every frame. UE4 support shadow caching only for point, spotlights.

Directionallight Caching Volume

With deferred shadow(LightAttenuationBuffer), We can cache portion of shadow of directionallight. We still need view dependant cascaded shadow for large object and moving characters(including vertex animated foliage and trees). The idea is place a volume at the area with dense geomtry and objects in this volume is excluded from cascaded shadow map rendering and a new cached shadow setup will be created with frutums created by that volume and directional light.


Like above drawing, we can set up shadow for group of objects for sun light(Green box is shadow caching volume, red box is shadow frustum) and we can easily cache this shadow using existing caching system. And this can be merged to cascaded shadow result(LightAttenuationBuffer). We can barely distinguish which pixel is from cascaded shadow or caching volume shadow.

UE4 Shadow Caching

After implemented this feature. I pretty satisfied that UE4 gracefully is adjusting shadow map size according to projected screen size of shadow so that total memory usage is being kept below 30 MB in typical setup. And because all cached shadow is  automatically recached if object or light move, artistic control is minimized.
file

ESM or VSM

ESM or VSM enables pre-filtering shadow map and enables soft shadow(despite light leak). When shadow map is being cached, pre-filtering cost could almost ignored. So I am considering  ESM filtering for environment shadowing.

2017년 7월 26일 수요일

G2 Online

After finishing my military service(which was basically working as programmer at a company), I started indie game project with my friend. We called it "Tactical fighters".
We wrote dx8 based in-house engine, and made prototype gameplay based on that engine.
And we showed it to my boss of the previous company. We couldn't receive fund but he proposed us to join his new company and do a new project within the company.

That is the start of "G2 online".


G2 was sequal of "GoldWing2". which had minor succuss in the company.
Basically G2 was flying FPS game. Not flight simulator.
The team was very small most time. only 2~3 programmers and small design and art team was involved. Though the features are very complex. It has most features of most MMORPG games and plus some new cool feature like replay system.

I referenced the Halo 3 replay system a lot. Players could record their play and share among other players.

And we made story mode too. I got to know that making game with story is very hard and time consuming job. It needs hard work of design/art team. If we didnt have story mode we could deliver this game a lot earlier.

Anyway this game didn't succeeded in the korean game market But had some fans in japan.

Youtube video uploaded by japanese fan.

It was many years ago and suddenly this memory came up to me this morning. And I could find some images and movie clip from internet.

This project taught me many thing.
ex : Making game takes long and hard work of many people.
ex : Hard work does not gaurantee success.
ex : Making game engine and game play with 2~4 programmers is stupid idea. (if it is not online game maybe it would not have been that hard).
ex : South koreans don't not like SF and Military at least on the game market.


Some more screenshot.
Boss(Gigantula)


Lobby
Boss(Leviathan)


2017년 7월 24일 월요일

Reconstructing world normal from depth to resolve decal artifact.

UE4 has deferred decal. and it is widely used in our levels.
Onday our artists complained that vertical projected decal pixel shows stretching artifact like below photo.


At first, I thought that multiplying dot(worldnormal, float(0, 0, 1)) to opacity could resolve this issue so that vertical face does not receive decal. But it turned out I was too naive.

Deferred decal material cannot read world normal gbuffer data while it writes normal to gbuffer. So I could use world normal to determine if it is vertical face.

I almost frustrated but soon found the solution. We actually can reconstruct world normal from depth buffer using ddx/ddy instruction.

world normal = cross(ddx(worldposition), ddy(world position)
Multiplying this to opacity give this!

Vertical face does not receive decal.


2017년 6월 19일 월요일

My little journey to next gen skin shading.

Recently, I spent some time reading papers / UE4 shaders code / various web pages about skin shading models. It was very interesting and I've got some achievements which I want to share.

Sub Surface Scattering
Skin is translucent surface and usually rendered with shading models based on scattering theory.
Light enters at some point and travels inside of translucent tissue and comes out at other point. This looks simple but needs some tricks to work in real time renderer.

Diffusion Profile
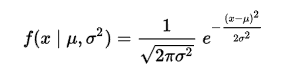
All of proper skin shading models are based on this theory and data. It describes how light is scattered along the distance from incident point.
People measures data how much light is scattered using real skin.

Perpendicular laser on real skin

Different diffusion curve among color channel
Using Gaussian function to fit this curve


Actual fitted gaussian parameters
And the curves are fitted to sum of gaussian functions. this fitted function is used to blur adjacent diffuse color pixels or to pre-integrate diffuse BRDF texture. I was curious that are there any measured data from asian or african american on the internet but got no success. What about some alien whose blood is blue? Maybe I should worry later about this.

Screen Space Sub Surface Scattering
Jorge Jimenez's method.
http://www.iryoku.com/sssss/

The core ideas is blurring diffuse irradiance in screen space using fitted gaussian kernel. Of course blur distance is adjusted according to depth and angle to be accurate.
This technique is well suited to deferred renderer and the quality is very good.
But some people would not agree this is the best method due to the low quality of low default diffuse irradiance and too much blur look. but this is still great skin rendering method.
I didn't do much research on this because UE4 version of this(SubSurfaceProfile) is perfect in my opinion.

Pre-Integrated Skin (Penner)
Another popular method is Penner's Pre-Integrated Skin.
https://www.slideshare.net/leegoonz/penner-preintegrated-skin-rendering-siggraph-2011-advances-in-realtime-rendering-course

The basic idea is to assume skin surface as circle and integrate diffusion profile according to two parameter(incicent angle and curvature of skin surface). He thinks that these two factors are most important parts of skin scattering.

This generates texture like below.


Actual hlsl shader code would be like,
float3 ScatteredLight = Texture2DSampleLevel(PreIntegratedBRDF, PreIntegratedBRDFSampler, float2(saturate(dot(N, L) * .5 + .5), Curvature), 0).rgb;

 U : indexed by cosine
 V : indexed by r(curvature)

There are many other details in this technique, but the basic idea is like this.

UE4 version of Pre-Integrated Skin Shading model
The overal structure is same,
-Pre-integrated BRDF texture(index by cosine and curvature like parameter)

But there are several difference between UE4 version and original.
-Pre-Interated Skin BRDF is applied only on shadowed region.
Unshadewd region is shaded by default lit(this is incorrect and make skin too bright)
-BRDF texture doesn't have different diffusion profile among color channel(frequency)
Texture tone is gray
BRDF texture contains grayscale(same diffusion among color channel) and multiplied by subsurface color provided by artist.
Actually subsurface color by artist is not that bad idea. But it is very difficult to make realistic human skin using UE4's pre-integrated skin shading model. 

I think this is why epic recommends SubSurfaceProfile model as high quality skin rendering.

By proper implementation according to oroginal paper, we can get below.
My implementation
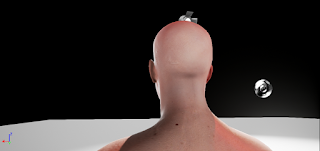
Due to the limitation of deferred renderer, I could not implement normal bluring, It could look a little bit harsh with rough normal map. but it was ok with our art direction. (we could control our normal map).

Translucency
With these two methods, rendered human skin already looks like skin. But we need more.
Because skin is translucent tissue, incident lights actually transmit through thin parts.
And should have effects like below,

light transmitted through thin ear.


And Jorge Jimenez wrote paper about this.

The most important idea is calculating thickness from light incident point to actual shading point. With this thickness we could know how much light will transmit through.
We know these two points in shadow projection shader. (Shadow depth value and shaded world point)

Actually, UE4 is already calculating this transmittance value and define this as "Sub Surface Shadow Term". This term is usually multiplied to various subsurface lighting terms.(ex: TWO_SIDED_FOILAGE). But it seems that both of two skin shading models lacks this effect.

So I added translucency effect of Jorge Jimenez to Pre-Integrated skin shading model.

With environment lighting

Due to the shadow depth range precision issue, It seems that spot light is most accurate for calculating thickness(transmittance or sub surface shadow term). Point Light lacks this feature.

Skin BRDF with Indirect Lighting
All of the above methods are for direct lightings. Sometimes game characters could be in lighting conditions which have only indirect lighting(shadowed region). Then all of these fancy skin shading will disappear.

UE4 multiplies subsurface color to diffuse irradiance(from Spherical harmonics probe). It could be ok with that. But there is something we could do for this sad situation. The graphics programmers in Ready At Dawn suggest excellent technique for applying skin BRDF with indirect probe.

The idea is like this,
We use clamped cosine as transfer function which will be dotted with irradiance spherical harmonics probe. This is zonal harmonics coefficients projected to represent clamped cosine function.
The idea of RAD programmers is to use special zonal harmonics transfer function which is projected to represent diffuse skin BRDF. They explained their idea kindly in there paper.
http://blog.selfshadow.com/publications/s2013-shading-course/rad/s2013_pbs_rad_notes.pdf

I implemented this and below image is generated zonal harmonics coefficients indexed by curvature.
X axis is curvature and Y Axis are zonal harmonics order.

First row : order 0, Second row : order 1, Third row : order 2
x axis : surface curvature
(with 30000 randome sample during monte carlo integration)

And this is the result. The result was quite impressive.

You can compare with normal diffuse irradiance from light probe.


Lighting condition used.
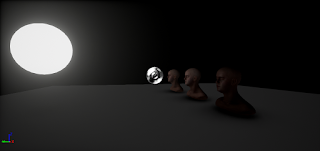
Emissive sphere and 1 light probe(no direct light)
3 zonal harmonics coefficients are projected using below generation code.

Order 0
_func = [this](double theta, double rInv)
            {
                float R = rInv * 255;
                float radius = 2.0f * 1.f / ((R + 1) / (float)SizeX);

                float cosTheta = FMath::Cos(theta);
                auto BRDF = IntegrateDiffuseScatteringOnRing(cosTheta, radius);

                return 0.28209479177 * BRDF.X *sin(theta);
            };
            D0R = 2 * PI * MonteCarloIntegral1D(0, PI / 2, NumMonteCarloSample, rInv);

Order 1
_func = [this](double theta, double rInv)
            {               
                float R = rInv * 255;
                float radius = 2.0f * 1.f / ((R + 1) / (float)SizeX);

                float cosTheta = FMath::Cos(theta);
                auto BRDF = IntegrateDiffuseScatteringOnRing(cosTheta, radius);
                return 0.4886025119 * cos(theta) * BRDF.X * sin(theta);
            };
            D1R = 2 * PI * MonteCarloIntegral1D(0, PI / 2, NumMonteCarloSample, rInv);

Order 2
_func = [this](double theta, double rInv)
            {
                float R = rInv * 255;
                float radius = 2.0f * 1.f / ((R + 1) / (float)SizeX);

                float cosTheta = FMath::Cos(theta);
                auto BRDF = IntegrateDiffuseScatteringOnRing(cosTheta, radius);
                return 0.31539156525 *  (3 * pow(cos(theta), 2) -1) * BRDF.X *sin(theta);
            };
            D2R = 2 * PI * MonteCarloIntegral1D(0, PI / 2, NumMonteCarloSample, rInv);

I used skin BRDF integration from this link.

I think maybe there will be more advanced skin rendering technique later. But these are best for now.